Cable Management for Home Office 2026: 12 Ideas That Work
Quick Answer
The 80/20: an under-desk cable tray plus a pack of reusable velcro ties solves most cable clutter for under $30 in about 30 minutes. Add a cable sleeve for the desk-to-wall run, and switch your keyboard, mouse, and phone charger to wireless if they aren't already. That's the whole system — everything below is context.
Key Takeaways
Twelve proven cable-management ideas for 2026: trays, sleeves, velcro, power strip placement. Clean, focused WFH desk in under an hour, under $60.
Our Verdict
An under-desk cable tray and velcro ties are all you need to transform a messy desk — 30 minutes of setup for a permanently cleaner, more productive workspace.
 #1 4.2 | 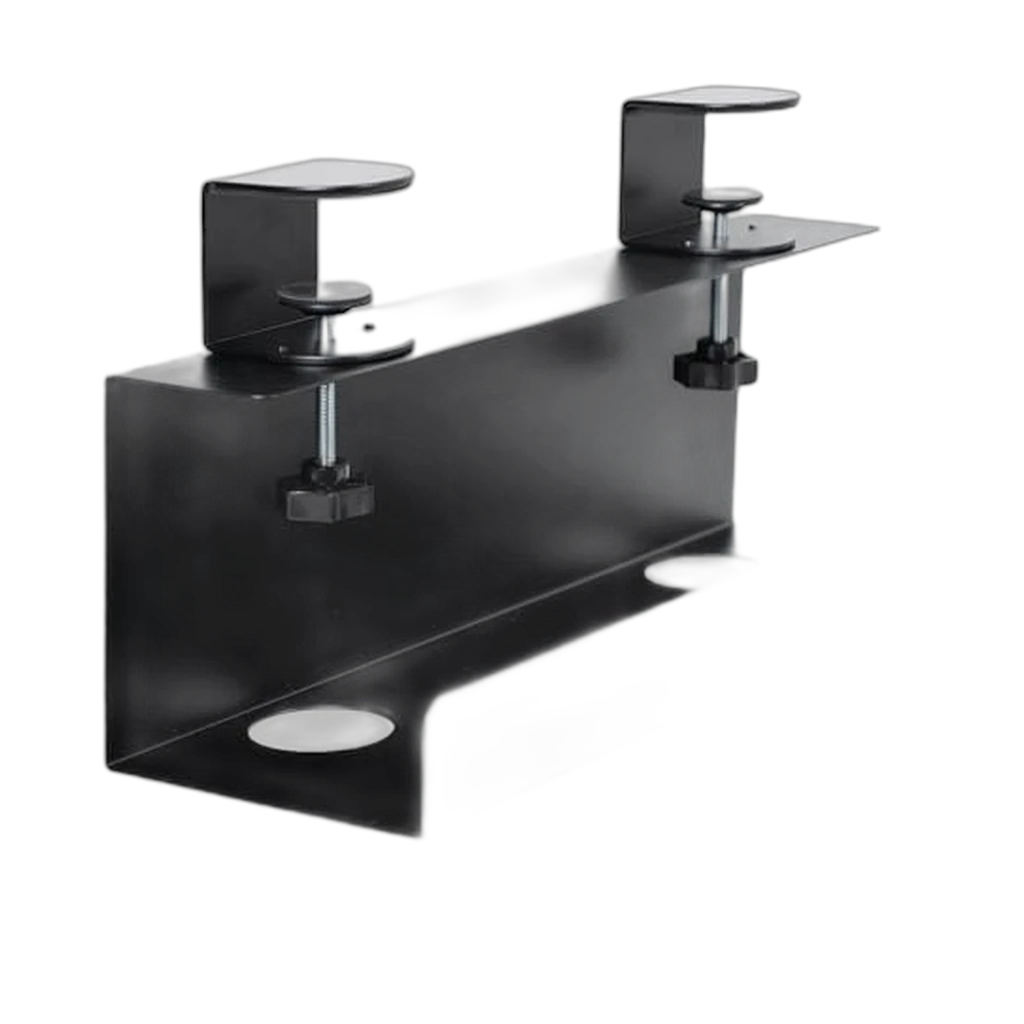 #2 4.6 |  #3 4.5 | 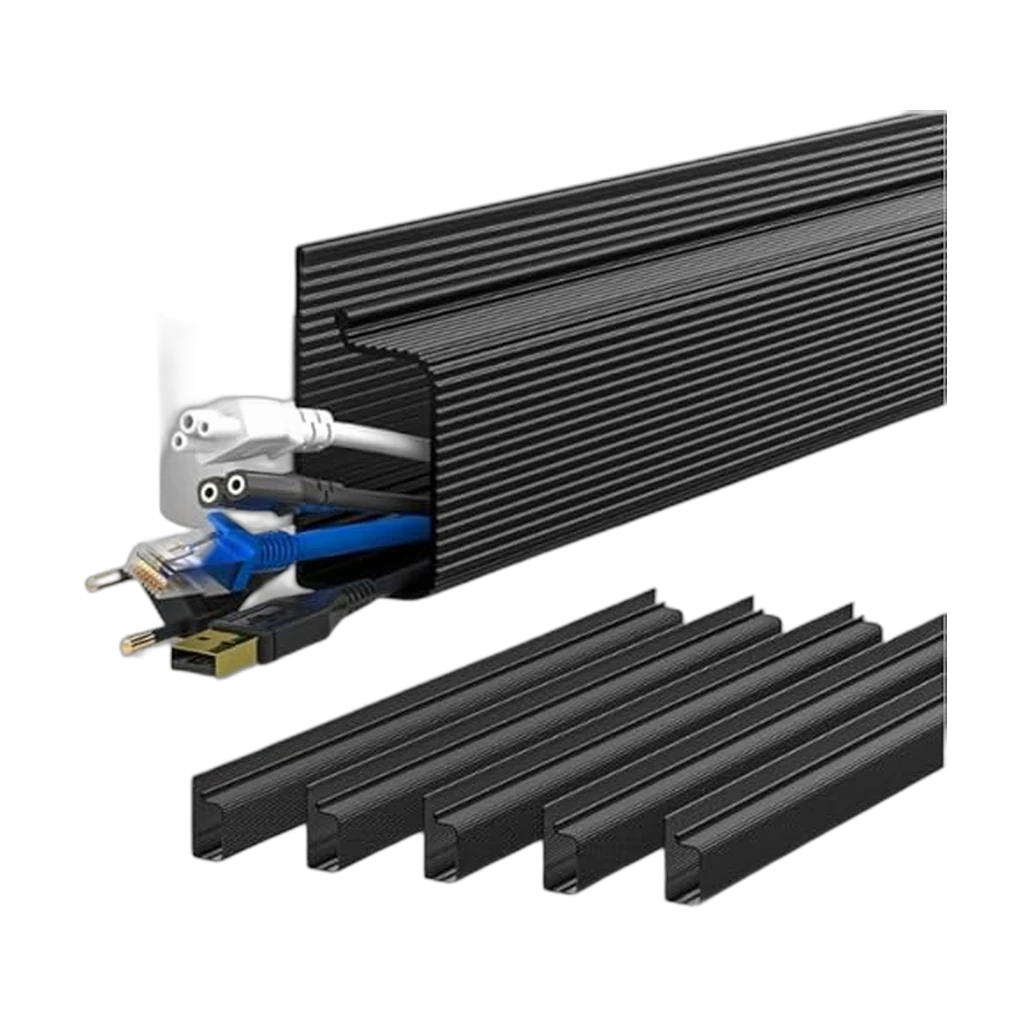 #4 4.6 | 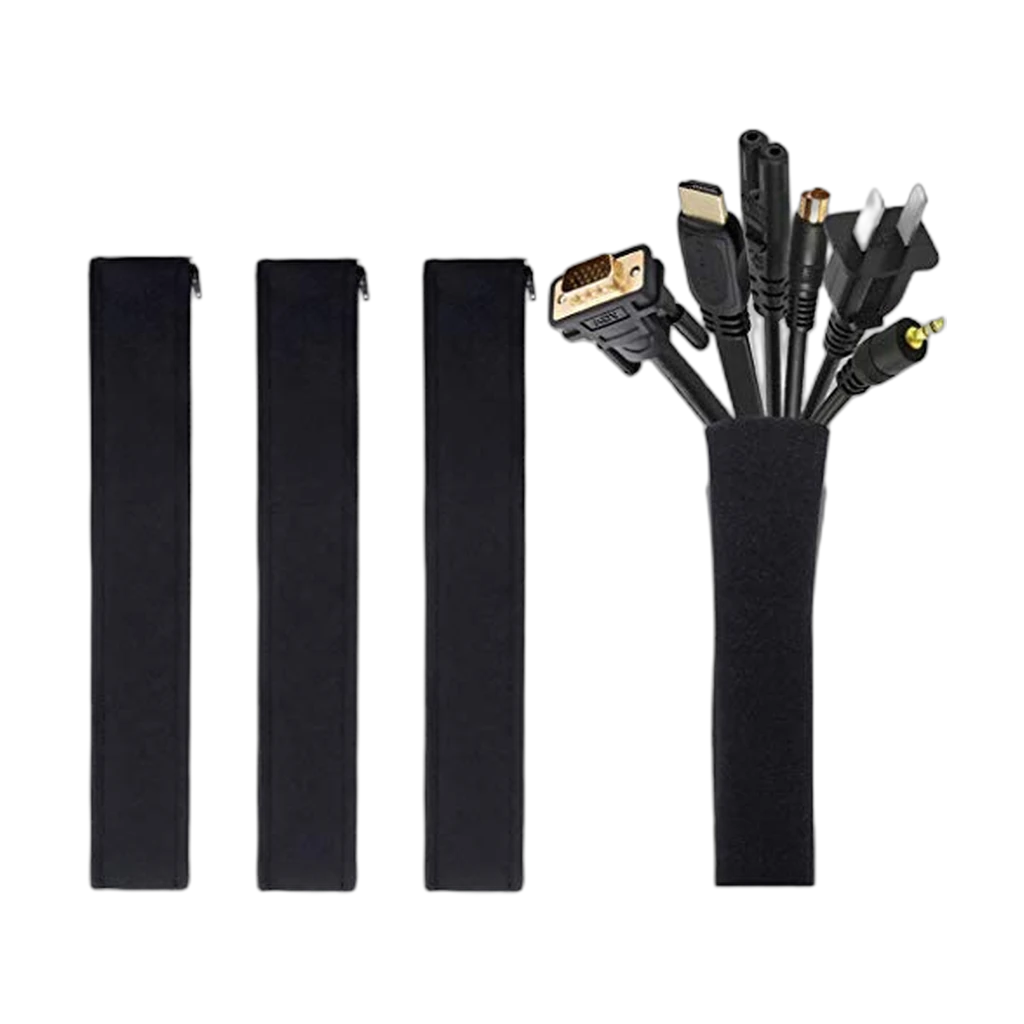 #5 4.6 | 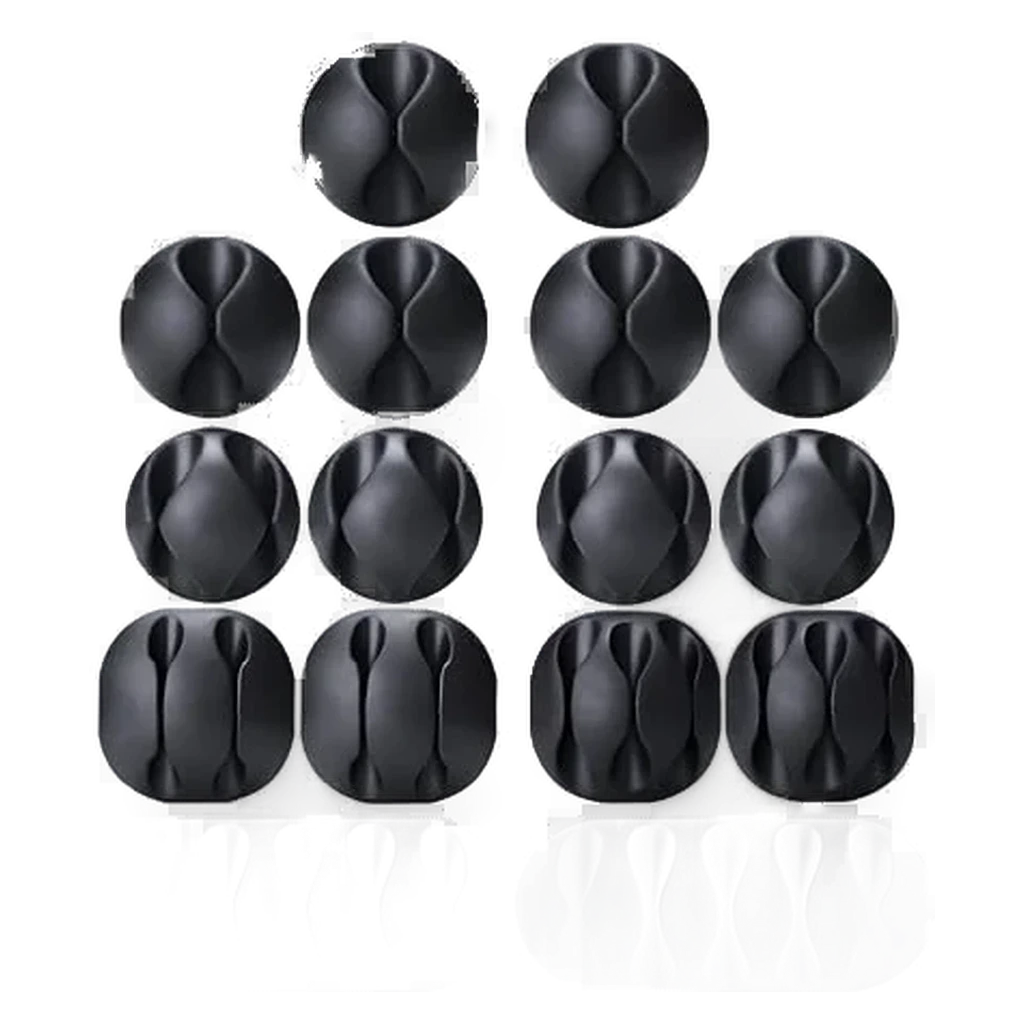 #6 4.3 | |
|---|---|---|---|---|---|---|
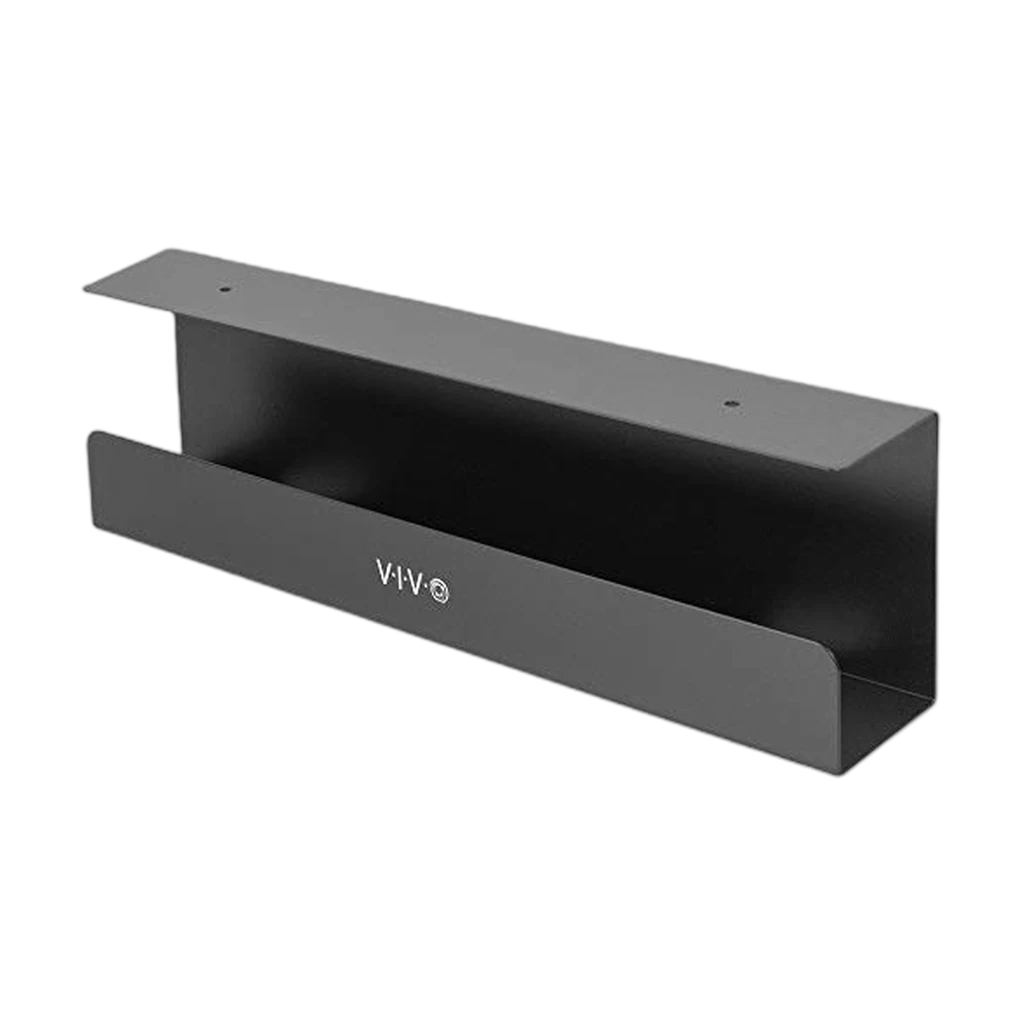
| Verdict | Steel tray that holds any power strip out of sight | Zero-drill clamp installs in minutes, perfect for renters | 13,000-review proven box that fully conceals any power strip | Six-piece raceway kit routes up to 10 cables per channel | Zip-up neoprene sleeves bundle the standing desk cable drop cleanly | 77,000-review clips that route any single cable along any surface |
| Buyer sentiment | Installation Durability Functionality Build Quality Buyers praise installation, durability, functionality and build quality. Mixed feedback on size. Based on 192 user mentions | Ease Of Installation Durability Quality Cord Holding Buyers praise ease of installation, durability, quality and cord holding. Based on 24 user mentions | Appearance Cord Visibility Quality Functionality Lid Functionality Buyers praise appearance, cord visibility, quality and functionality. Mixed feedback on size and sturdiness. Some flag lid functionality. Based on 1,681 user mentions | Easy To Use Functionality Quality Cable Management Buyers praise easy to use, functionality, quality and cable management. Mixed feedback on adhesive. Based on 975 user mentions | Quality Ease Of Use Functionality Appearance Buyers praise quality, ease of use, functionality and appearance. Mixed feedback on zipper. Based on 4,768 user mentions | Functionality Quality Ease Of Use Organization Adhesion Durability Stability Buyers praise functionality, quality, ease of use and organization. Mixed feedback on value for money. Some flag adhesion and durability. Based on 6,892 user mentions |
| Price | $19.99Check price on Amazon | $39.99Check price on Amazon | $27.99Check price on Amazon | $16.14Check price on Amazon | ||
| mounting | screw (included) | clamp-on (no drill) | surface-standing | self-adhesive (peel-and-stick) | free-hanging / velcro loop optional | self-adhesive (peel-and-stick) |
| material | steel | steel | ABS plastic (electrically-safe rated) | PVC (flame-retardant) | neoprene (zipper closure) | plastic + foam adhesive pad |
| dimensions | 16.5" L x 3" W x 4.5" H | 17" L x 6" W x 5.8" H | 16.5" L x 6.5" W x 5.25" H | 6 x 15.7" channels (94.2" total) | — | — |
| weight_capacity | 11 lbs | 11 lbs | — | — | — | — |
| color_options | black, white | — | black, white | black, white | — | black, white |
| desk_thickness_max | — | 2 inches | — | — | — | — |
| entry_slots | — | — | 3 rear | — | — | — |
| channel_capacity | — | — | — | up to 10 cables per channel | — | — |
| length | — | — | — | — | 19-20 inches per sleeve | — |
| pack_count | — | — | — | — | 4 sleeves | 16 clips (mixed sizes) |
| max_cables | — | — | — | — | 6-8 per sleeve | — |
| cable_diameter | — | — | — | — | — | up to ~8mm per clip |
| Pros |
|
|
|
|
|
|
| Cons |
|
|
|
|
|
|
* Prices checked Jun 19, 2026 and may vary. Check the latest price on Amazon.
As an Amazon Associate I earn from qualifying purchases. Product prices and availability are subject to change.
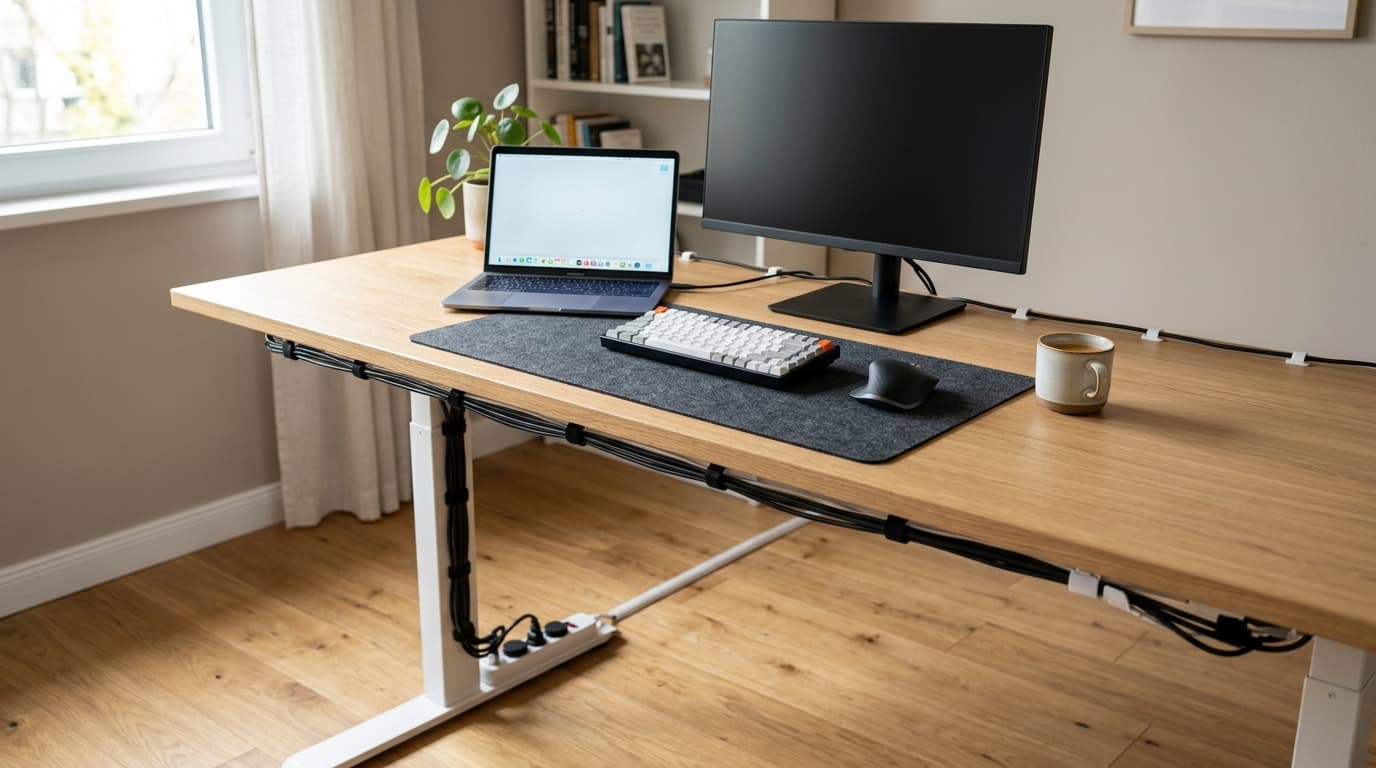
A messy tangle of cables under your desk isn't just ugly — it's a productivity killer. Visual clutter competes for your attention, tangled cables make it harder to troubleshoot when something disconnects, and dust collects on cable nests like a magnet. The good news is that solid cable management takes about 30 minutes to set up and costs under $50 in supplies.
This guide walks you through a practical, step-by-step approach to organizing every cable in your home office — from power cords to USB connections to charging cables.
Why Cable Management Matters
Beyond aesthetics, organized cables deliver practical benefits:
Essential Cable Management Supplies
Before you start, gather these supplies. Everything listed below is available for under $50 total on Amazon.
Under-Desk Cable Tray ($15-25)
An under-desk cable tray is the single most impactful cable management purchase. It's a metal or plastic channel that mounts underneath your desk surface, capturing all your power cables, adapters, and surge protectors. From seated position, everything disappears.
Top pick: J Channel Cable Raceway — mounts in minutes with adhesive or screws, holds up to 10 cables.
Velcro Cable Ties ($8-12 for a pack of 50)
Never use zip ties for cable management. They're permanent — once you cut one to adjust a cable, you need a new one. Velcro ties are reusable, adjustable, and just as effective. Buy a pack of 50 and you'll have enough for your entire home office with plenty to spare.
Top pick: VELCRO Brand ONE-WRAP Cable Ties — the original and still the best.
Cable Clips ($6-10)
Adhesive cable clips attach to the edge of your desk or the wall behind it, holding individual cables in place. They're perfect for charging cables that you plug and unplug frequently — the clip holds the cable in reach when it's not connected to a device.
Cable Sleeve ($8-15)
A cable sleeve is a flexible fabric tube that bundles multiple cables running the same route into a single clean line. They're ideal for the run from your desk to the wall outlet, where power cables, ethernet, and other connections travel together.
Step-by-Step Cable Management
Step 1: Unplug Everything
Start fresh. Unplug every cable from your desk setup and lay them all out. This is your chance to identify cables you don't even use anymore — old chargers, redundant USB cables, that ethernet cable from before you switched to Wi-Fi. Remove anything you don't actively need.
Step 2: Map Your Cable Routes
Before plugging anything back in, plan where each cable needs to go. Most home office cables fall into three categories:
Group cables by destination and route them together where possible.
Step 3: Install the Under-Desk Tray
Mount your cable tray along the back edge of your desk's underside. Place your power strip inside the tray — this single change hides the bulkiest, ugliest part of your cable setup. Now every power cable routes into the tray and connects out of sight.
Step 4: Bundle and Route
Use velcro ties to bundle cables that run the same path. A typical bundle might be your monitor's power cable and display cable tied together as they route from the monitor to the desk tray. Keep bundles loose enough that cables aren't strained at connection points.
Step 5: Manage the Desk-to-Wall Run
The cable run from your desk to the wall outlet is often the most visible mess. Use a cable sleeve to combine all outbound cables into a single, clean line. For a standing desksit-stand deskA desk whose surface raises and lowers (electric or crank) so you can alternate sitting and standing through the day. Cornell ergonomics research recommends ~30-min sitting / ~10-min standing / ~2-min walking cycles, not all-day standing., leave enough slack in this run that cables don't pull tight at maximum desk height.
Step 6: Add Desk-Edge Cable Clips
For cables you plug and unplug frequently (phone charger, headphone cable), attach adhesive cable clips to the edge of your desk. When the cable isn't connected to a device, it stays clipped in place at desk level instead of sliding to the floor.
Advanced Cable Management Tips
Go Wireless Where Possible
The fewer cables, the less to manage. In 2026, these peripherals are effectively wireless with no performance penalty:
Switching four peripherals from wired to wireless eliminates four cables from your desk entirely. See our complete setup guide for wireless peripheral recommendations.
Use a USB-C Hub to Reduce Cable Count
If your monitor supports USB-C with power delivery, a single USB-C cable replaces your display cable, laptop charger, and USB hub. That's three cables reduced to one — the single biggest cable reduction you can make.
A good USB-C hub adds ports for everything else you need while keeping your desk minimal.
Color-Code Your Cables
When multiple cables run together, use different colored velcro ties or label them with a label maker. This makes future troubleshooting instant — you can identify any cable without tracing it end to end.
Standing Desk Cable Management
Standing desks add complexity because cables need to accommodate a height range of about 18 inches. Key strategies:
Frequently Asked Questions
How often should I redo my cable management? Redo it whenever you add or remove a device from your setup. For most people, that's 2-3 times per year. A well-managed initial setup stays clean with minimal maintenance.
Should I use cable raceways on the wall? Wall-mounted raceways are excellent for hiding the cable run from desk to outlet, especially in apartments where you can't run cables through walls. Paintable raceways blend with your wall color for a near-invisible look.
What about cable management for dual monitor setups? Dual monitors double your cable count, making management even more important. Route both monitors' cables together along the same path to the cable tray. A dual monitor arm with integrated cable channels helps enormously.
The Bottom Line
Cable management isn't glamorous, but it's one of the most satisfying home office upgrades you can make. Start with an under-desk cable tray and a pack of velcro ties — those two items solve 80% of cable clutter for under $30. Then add cable clips, sleeves, and wireless peripherals as needed.
The 30 minutes you invest in organizing your cables pays dividends every single day in cleaner aesthetics, easier maintenance, and the subtle but real focus benefit of a clutter-free workspace.
Related Reading
- →Best Desk Accessories for WFHComplete your clean desk setup
- →Best USB-C Hubs for WFHReduce cable count with one connection
- →Best WFH Setup for 2026Plan your entire home office
- →How to Set Up Dual Monitors Working From HomeCable management for multi-monitor setups
- →Cable ManagementOur top cable management product picks
Your next step
Get the gear that tidies it up.
Hilly Shore Labs
Editorial TeamWFH Lounge is published by Hilly Shore Labs. Every recommendation is built by synthesizing ergonomic research, manufacturer specs, expert reviews from outlets like Wirecutter, RTINGS, and The Verge, and aggregated long-term owner sentiment from thousands of verified buyers.
All product reviews are independently researched. Our recommendations are based on ergonomic guidelines, manufacturer specifications, and verified buyer sentiment. See our methodology.


